The information, illustrations and code contained in my "Microsoft Word Tips" are provided free and without risk or obligation.
However, the work is mine. If you use it for commercial purposes or benefit from my efforts through income earned or time saved then a donation, however small, will help to ensure the continued availability of this resource.
If you would like to donate, please use the appropriate donate button to access PayPal. Thank you!
T his Microsoft Word Tips & Microsoft Word Help page is demonstrates several methods that your can employ to control and display conditional text in your document headers and/or footers.
Word support forums are are replete with questions like "How do I prevent my footer text from appearing on the last page?" or "I want my header text to appear only on the last page. What do I do?"
These requirement go beyond Word's familiar "Different first page" and "Different odd and even" page layout settings which are explained in a useful manner at Word MVP Suzanne Barnhill's: Numbering Front Matter (Toolbar) or Numbering Front Matter (Ribbon)
For questions like these, help is on the way in the form of "fields." Whether you display it or not, Word keeps track of page numbers and the total number of pages a document contains. This information can be put to work using fields.
Prove it to yourself.
Here is another useful field.
You can use these powerful fields to create conditions for comparison and display the result.
Take the first question "How do I prevent my footer text from appearing on the last page?" Word already knows the number of your last page and the number of pages in the document. Let's think about it.
To put these thoughts in action, we employ the IF field. The basic IF field compares two values and returns one of two user defined results. Take the following IF field for example:

The IF field compares the page number to the total number of pages. If the condition is satisfied (i.e., the two are equal), the IF field returns the text contained in the first pair of speech marks "" (i.e., in this case nothing). If the condition is not satisfied, the IF field returns the text within the second pair of speech marks "Your Footer Text."
Let's look at the other approach.

Do you see the comparison here? If the page number is less than the number of pages, the field returns "Your Footer Text" if not, the field returns "" (or nothing).
Put either of the above IF conditional fields in your document footer and your problem is solved!!
How about "I want my header to appear on the last page only. What do I do?" Ask your self the question and develop a logical IF expression to provide the answer:

How about "I want my header text on page 5 and 6 only!!" Well this is a little tougher and requires a bit of thinking, but if we "nest" a couple of IF fields the solutions is at hand:

Here the IF field makes the first comparison and either returns (displays) nothing for pages less less than 5 or moves to the second "nested" IF field for a second comparison. In the second comparison, the IF field either returns nothing for page numbers greater than 6 or prints a displays your defined text on page 5 and 6.
Bonus Tip: The constructions shown above make liberal use of the empty double speech marks for demonstration purposes. Speech marks serve as place markers and are not actually required when the value to be returned is already enclosed in field code brackets or if a null value is at the end of the sting. For example, the highlighted speech marks in < IF >= "5""

Some documents require a conditional header or footer based on text content. One challenging example is a classified document with SECRET, CONFIDENTIAL or UNCLASSIFIED elements. The standard (at least the military standard) is that each data element (e.g., document paragraph) be marked with its proper classification and the header and footer be marked with the highest classification level contained on the page. This can be a real challenge and using section breaks to create the proper header and footer can lead one to the brink of madness.
Several years ago I worked with Word MVP Peter Jamieson on this problem and Peter developed a brilliant combination of of QUOTE, SEQ, IF, and PAGE fields to simplify this task immeasurably.
Let's first look at the required fields then explain how they work. The first two field combinations are used to mark the classification of the text either (S) or (C):

Fields

Displayed text
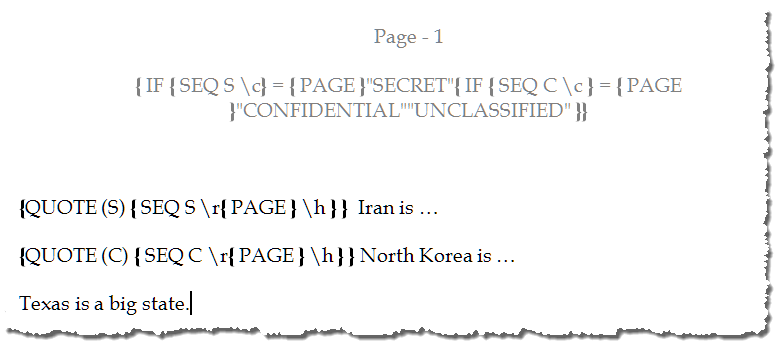
The displayed paragraph classification markings (S) and (C) result from the QUOTE field which returns literal text (i.e., (S) in one case or (C) in the other). There is more at work in these two fields however. You will note that each QUOTE field contains a "nested" SEQ field. SEQ fields display sequential numbers and require a sequence ID (here the letters "S" and "C" are used for the sequence identifiers). The two SEQ fields here are further refined by field switches and a "nested" PAGE field. The first switch "\r" resets the sequence number to the number following the "r." That number is defined by a field. This means that wherever one of these fields are used, the SEQ field associated with it is reset to the value of the page number where it is used. Since we don't want the SEQ field value displayed, or printed, we use a second switch "\h" is used which instructs Word to hide the SEQ field result.
The third field combination determines and displays the required header or footer text:

Fields 
Displayed text
The header and footer employs the now familiar "nested" IF field. Here we will use the values of the hidden sequence numbers created by the text marker fields to compare with the page number and determine the proper header and footer text. Remember IF the page contains text marked (S) or any combination of text marked (S), (C), or unclassified text the field must display SECRET. If the page contains only text marked (C) or any combination of text marked (C) and unclassified text the field must display CONFIDENTIAL. If there is no (S) or (C) marked text the field displays UNCLASSIFIED.
The first "nested" SEQ field < SEQ S \c >employs a switch "\c" which instructs the field to return the value of the nearest "preceding" sequence number.
Here things may begin to appear odd. If you print a Word document or look at it on the screen, the main body text on page 1 obviously follows the page 1 header text. However a Word document is not "printed" or "displayed" until all the internal calculations and formatting are completed behind the scene. Backstage a Word document is sort of like one of those static anatomical charts where you lift the skin layer to to see the muscle, lift the muscle layer to see the bones, etc.. In the SEQ field calculations, the main body text on page 1 is synonymous with the skin, the headers and footers are synonymous with the muscle. This means all of the \h> fields in the main body text on page 1 actually precedes the field in the header and footer on page 1.
Let's collapse the header and footer "nested" fields one at a time to see what is happening.
Classified text marked "(S)" using the Quote field is present on page 1

The nested SEQ field will return the value 1 as demonstrated previously and hide the result. Since this hidden field value 1 precedes the field in the header, The field it will also return a value of 1.
The field will also return 1.

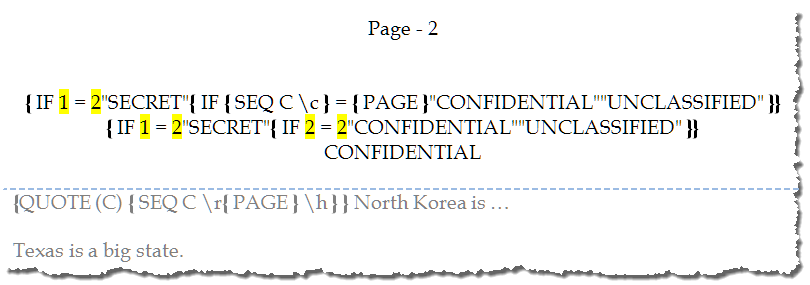
Highlighting reflects the result of collapsed fields.
It should be clear that IF 1=1 (It does) then the IF field will return the text inside the first set of speech marks, or "SECRET"
In the next illustration, we have page 2 which contains a combination of classified text marked (C) and unclassified text. There is no secret text marked on the page (first condition not met). You should see that the second condition condition = is met and the field displays "CONFIDENTIAL."

In headers where neither condition is met the display is "UNCLASSIFIED."
Bonus Tip: To make use of the text marker fields more efficient, you should create AUTOTEXT. Select the result of an updated (S) field and press ALT+F3. Name the entry (I use secret for (S) and confidential for (C)). Repeat for an (C) field entry. Use these AUTOTEXT to easily mark your classified text.
That's it! I hope you have found this tips page useful and informative. You can download a template containing the Header and Footer field codes, text mark field codes, and text mark AUTOTEXT entries here: Classified Document
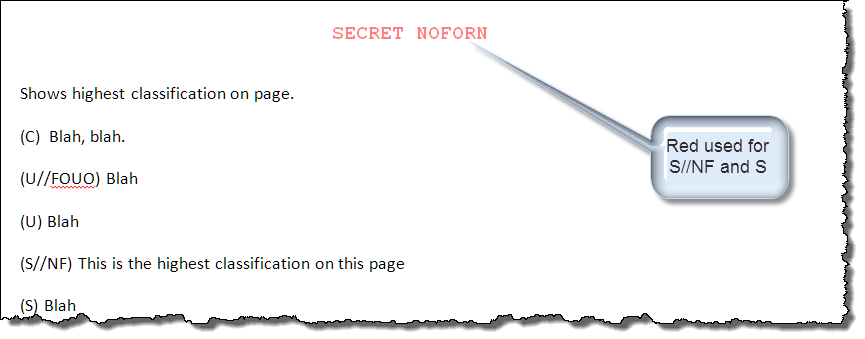
In November 2017, years after first publishing this tips page, an American hero working at the U.S. Fleet Forces Command, Norfolk VA put this page to good use. In addition to the classification marking text, his requirement included a color code for the various classification levels.


The field code is similar to those illustrated above.

The information, illustrations and code contained in my "Microsoft Word Tips" are provided free and without risk or obligation.
However, the work is mine. If you use it for commercial purposes or benefit from my efforts through income earned or time saved then a donation, however small, will help to ensure the continued availability of this resource.
If you would like to donate, please use the appropriate donate button to access PayPal. Thank you!
Search my site or the web using Google Search Engine
This page was last updated on March 09, 2021
Back to top Back to Word Tips